14th December 2015 by aegeuana_sjp_admin
How to Deploy a Qt QML application on Mac [part 1]
When you have your application ready and you want to share your awesome product with the rest of the world, it is time to deploy – and the problems to begin. There are many ways to deploy an application but during the deployment process you are likely to face a lot of problems with dependencies and dynamically linked libraries.
I was looking for any tutorial with instructions on how to deploy on Mac OSX but I haven’t found a lot. It took me a while to connect all the parts and finally create a ready-to-go product. In this series I will try to describe all the necessary steps I went through from compilation to creating the installer.
The process described in this post is specifically for OS X deployments and assumes that you’re using QtCreator during development.
You can find more information about troubleshooting and deployment of Qt applications on the QtProject documentation.
First of all we should build our project in ‘Release’ mode:
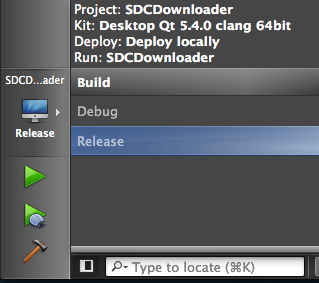
QtCreator build release
Now we can find the ‘*.app’ file inside our build directory.
The next step is to link all the dependencies such as Qt libraries etc. To do this we will use ‘macdeployqt’. It is a simple and easy to use command line application that will automatically copy the necessary files into our ‘*.app’ folder and link them to our executable file. You can find more information about ‘macdeployqt’ here.
[code language=”bash”]
/path/to/macdeployqt.app/Contents/MacOS/macdeployqt /Users/test/build-OurApp-Release/OurApp.app -qmldir=/Users/test/OurProject -verbose=3
[/code]
For the ‘-qmldir’ argument, we should specify the full path to the folder where our QML files are located. This will allow ‘macdeployqt’ to detect which packages we’ve used. If we are not using QML inside our project we don’t need to specify the ‘-qmldir’ path. The ‘-verbose’ argument will show us all the actions when creating the deployed version.
Theoretically this should be everything and our app should work but in the real world it is not so simple. Sometimes the DLLs are not linked properly or some components are trying to use the libraries from the operating system (sometimes we want to provide the DLLs in order to not force users to install additional stuff themselves).
It is really useful to run our application from the console. This will allow us to see all the errors and debug messages.
[code language=”bash”]
cd /Users/test/build-OurApp-Release/
./OurApp.app/Contents/MacOS/OurApp
[/code]
This is what I saw:
[code language=”bash”]
QSslSocket: cannot resolve TLSv1_1_client_method
QSslSocket: cannot resolve TLSv1_2_client_method
QSslSocket: cannot resolve TLSv1_1_server_method
QSslSocket: cannot resolve TLSv1_2_server_method
QSslSocket: cannot resolve SSL_select_next_proto
QSslSocket: cannot resolve SSL_CTX_set_next_proto_select_cb
QSslSocket: cannot resolve SSL_get0_next_proto_negotiated
[/code]
In my case the ‘libssl’ library was linked to the wrong version (old one). In such a case I want to provide the right version within the application bundle in order to not depend on the user’s resources.
I’ve copied the new version of libssl.dylib into the Frameworks folder inside ‘*.app’.
Next we need to tell our application to use this library:
[code language=”bash”]
cd /Users/test/build-OurApp-Release/
install_name_tool -add_rpath @executable_path/../Frameworks/ OurApp.app/Contents/MacOS/OurApp
[/code]
Useful tips:
I found some useful stuff on Blog Inventic.
Also if you want to see all ‘.dylib’ loaded in real time you can set the ‘DYLD_PRINT_LIBRARIES’ to 1
[code language=”bash”]
export DYLD_PRINT_LIBRARIES=1
[/code]
This solved my problem and I could run my application on other Mac OSX computers without any external dependencies.
The next part of this series will demonstrate how to create a proper installer and how to associate an icon and custom file type to our application.