
9th December 2014 by aegeuana_sjp_admin
Using HTTPS on localhost
There are several ways to run a dev server on a local machine. We can achieve this with built-in tools in the dev environment (such as ‘Django server’) or by setting up ‘nginx’ locally etc. All these solutions are awesome to use during day-to-day work and development.
However, each of these connections runs on a standard insecure HTTP protocol. Sometimes we want to work with third party services which are served by HTTPS and that we can not access without HTTPS on our server or we just simply want to test our system with a secure connection. To do this we need to enable HTTPS on our localhost. If anyone has ever tried to set it up, you may have noticed that it is not as easy as it sounds, and can be a little bit tricky.
1. Tunnelling
The fastest way of achieving this is to use ‘ngrok’. It is quite slow to work with but we are getting it for free. It allows tunnelling between our local HTTP server and we can stream it as HTTPS so that we can access it online.
[code language=”bash”]
./ngrok –subdomain=’our-domain-name’ 8000
[/code]
Where ‘subdomain’ is the address through which we can access our page, and ‘8000’ is the port our server is running on, on our local machine.
[code language=”bash”]
http://our-domain-name.ngrok.com
https://our-domain-name.ngrok.com
[/code]
2. Create a certificate
Another way to use an HTTPS connection on our dev server is to create a self signed certificate. The important thing to notice is that this certificate is not working for a specific IP so we need to generate our certificate for an alias that is ‘localhost’.
2.1 Create a certificate and key
The following example is taken from here.
a) Generate the key
You can generate the key as follows:
[code language=”bash”]
openssl genrsa -des3 -out server.key 1024
[/code]
b) Generate a CRT file
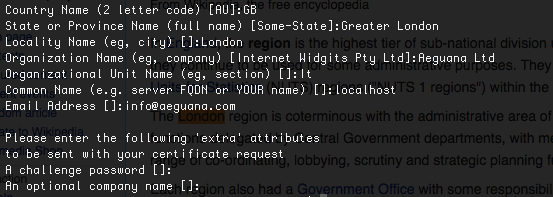
When executing this command remember to set all the required informations and set ‘Common name’ to ‘localhost’.
[code language=”bash”]
openssl req -new -key server.key -out server.csr
[/code]
c) Remove the passphrase from the key
You need to remove the passphrase from the key as follows:
[code language=”bash”]
cp server.key server.key.org
openssl rsa -in server.key.org -out server.key
[/code]
d) Generate a self-signed certificate
We can specify the period of time our certificate will be valid for by changing the ‘-days’ value.
[code language=”bash”]
openssl x509 -req -days 365 -in server.csr -signkey server.key -out server.crt
[/code]
After that we can use our certificate.
2.2. Install certificate
Now we need to install the certificate on our system. This process is different for each system.
a) Mac:
Follow the following steps:
- – Open the certificate (double click) using Key Chain
- – Choose ‘System’ keychain
- – Set ‘Always Trust’
- – Edit the added certificate and expand the ‘Trust’ tab and set ‘When using this certificate’ to ‘Always trust’
b) Linux:
You simply need the following code:
[code language=”bash”]
sudo cp server.crt /etc/ssl/certs
sudo cp server.key /etc/ssl/private
[/code]
Our self signed certificate is now registered on our system, so the browser will fetch it automatically and treat it as a proper SSL certificate.
2.3. Using the certificate
Now we are ready to run our server and use our certificate. We can do it in few ways as well:
a) Flask:
This is the simplest way of running our server with HTTPS protocol. We can provide the certificate and the key straight into the method run.
[code language=”python”]
from flask import Flask
app = Flask(__name__)
app.run(‘0.0.0.0’, debug=True, port=8100, ssl_context=(‘$PATH/server.crt’, ‘$PATH/server.key’))
[/code]
b) Django:
Unfortunately we can not use native Django to do this.
One of the solution is to install django-sslserver and provide certificate/key. After that we can run our django server in HTTPS mode.
[code language=”bash”]
pip install django-sslserver
[/code]
Then we need to add it to our installed apps as follows:
[code language=”python”]
INSTALLED_APPS = (
"sslserver",
…
)
[/code]
Now we can run it by doing the following:
[code language=”bash”]
python manage.py runsslserver –certificate $PATH/certificate.crt –key $PATH/key.key
[/code]
c) NGINX
The last described method, but also a really universal way of achieving this is to set up a local server with ‘nginx’.
I found a simple configuration file for ‘nginx’ here, which will detect your local server running on port 3000.
- – Install ‘nginx'(instructions here)
- – Replace default conf file ‘$PATH/nginx.conf’ with the one provided below.
- – Reload ‘nginx’ settings
You can reload the nginx settings using:
[code language=”bash”]
sudo nginx -s reload
[/code]
Sample ‘nginx’ configuration file.
[code language=”bash”]
# nginx.conf
worker_processes 1;
events {
worker_connections 1024;
}
http {
include mime.types;
default_type application/octet-stream;
send_timeout 1800;
sendfile on;
keepalive_timeout 6500;
server {
listen 80;
server_name localhost;
location / {
proxy_pass http://localhost:3000;
proxy_set_header Host $host;
proxy_set_header X-Real-IP $remote_addr;
proxy_set_header X-Forwarded-For $proxy_add_x_forwarded_for;
proxy_set_header X-Client-Verify SUCCESS;
proxy_set_header X-Client-DN $ssl_client_s_dn;
proxy_set_header X-SSL-Subject $ssl_client_s_dn;
proxy_set_header X-SSL-Issuer $ssl_client_i_dn;
proxy_read_timeout 1800;
proxy_connect_timeout 1800;
}
}
# HTTPS server
server {
listen 443;
server_name localhost;
ssl on;
ssl_certificate server.crt; # provide full path to the cert file
ssl_certificate_key server.key; # provide full path to the key file
ssl_session_timeout 5m;
ssl_protocols SSLv2 SSLv3 TLSv1;
ssl_ciphers ALL:!ADH:!EXPORT56:RC4+RSA:+HIGH:+MEDIUM:+LOW:+SSLv2:+EXP;
ssl_prefer_server_ciphers on;
location / {
proxy_pass http://localhost:3000;
proxy_set_header Host $host;
proxy_set_header X-Real-IP $remote_addr;
proxy_set_header X-Forwarded-For $proxy_add_x_forwarded_for;
proxy_set_header X-Client-Verify SUCCESS;
proxy_set_header X-Client-DN $ssl_client_s_dn;
proxy_set_header X-SSL-Subject $ssl_client_s_dn;
proxy_set_header X-SSL-Issuer $ssl_client_i_dn;
proxy_read_timeout 1800;
proxy_connect_timeout 1800;
}
}
}
[/code]
There is no ‘best’ method for setting up HTTPS locally. We can choose whatever method we like to suit the application. Good luck.